 The 1911 type of firearms have one of the best trigger actions available in any gun. It is simple, direct and positive acting and possible to adjust and tune to match any requirement. But, it is very important to understand the action and how all of the components work together to, both produce that wonderfully crisp and quick release and reset and still remain fully safe when ‘cocked and locked’ and not being squeezed in the shooter’s hand.
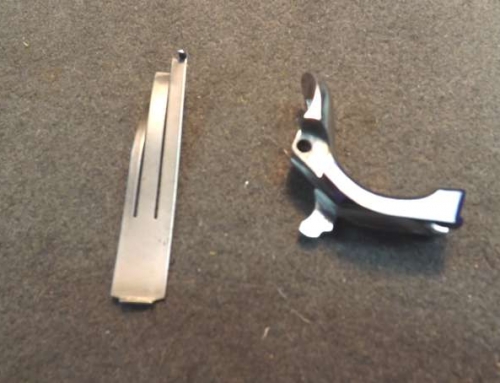
A good feeling trigger pull starts with the trigger itself, the trigger bow and how the assembly fits in the frame and wraps around the magazine. A lightweight trigger adds to a lightweight feel but also adds to the overall safety of the firearm by reducing the possibility that the gun will ‘double’ or worse. You see, a steel trigger is a heavy trigger. In some actions where the other components have been adjusted to achieve the lightest possible trigger pull, a heavy trigger can have enough mass that the inertia of recoil will cause that mass to move and release the sear, without the shooter having touched the trigger. This is known as ‘trigger bounce’.
 It not only feels better, but it is significantly safer to use a lightweight material for the trigger shoe and trigger bow assembly. There are aluminum shoes with stainless or aluminum bows, polymer shoes with stainless or aluminum bows and magnesium shoes and titanium bows. I’ve built and refitted guns with all of them.
  I find the aluminum shoe and stainless bow assembly by Wilson Combat to be my favorite for a lightweight assembly with a smooth and strong bow material at a reasonable cost. If cost is no consideration, the titanium bow with magnesium shoe assembly is tops.
All good, aftermarket trigger assemblies are adjustable for take up and overtravel. Little tabs on the top or bottom of the bow where it is attached to the shoe can be adjusted to reduce take up and forward positioning in the frame. An adjusting screw that bears against the magazine catch can be adjusted to limit the over travel. You want to allow just a little take up so the sear can reset without slapping the back of the disconnector and trigger bow and perhaps cause ‘trigger bounce’ and/or not assure a positive disconnector reset.
The back of the bow should be a flush fit or just slightly below flush with the back of the frame slots. If the back of the trigger bow is set at a slightly shallower angle than the back of the frame slots, it is intended to reduce any sear bind and allow better adjustment of the trigger over travel stop. In some cases this reduced angle will cause a problem because it is too long and will pick up the center finger of the sear spring. The bottom edge of this trigger bow can be milled or filed to shorten it, just enough to clear the sear spring. This will stop problems with the disconnector being ‘unsprung’ when the trigger is held all the way back. Overtravel can be adjusted with just a hint of movement after the sear releases to assure a complete and positive sear release when the trigger is pulled.
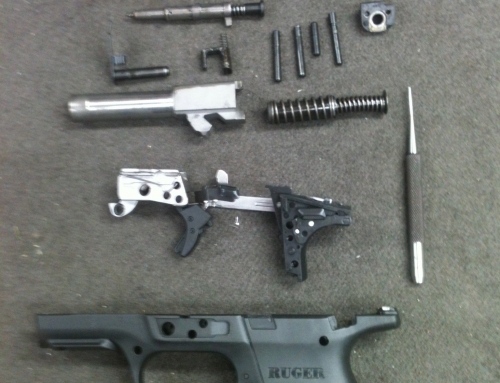
 Fitting the trigger starts with stoning and smoothing the tracks in the frame where the shoe and bow slide. These are tricky areas to get at and see, but they can be smoothed with a stone sized to slide in the recesses, available through Brownells. I’ve also used a piece of steel milled to fit the slots and several grades of very fine polishing abrasive to put a nice polish to the slots.
  Once the frame recesses are nice and shiny, the trigger shoe has to have any excess material milled or filed off the top and bottom and the surfaces smoothed so it slides effortlessly in the recesses without any drag or excess vertical travel and the trigger bow can be polished, if it isn’t already, on both the inside and the outside so there can be no perceptible drag in its motion back and forth on either the frame tracks or the magazine. Smooth and polish all the surfaces. At this point, I apply some of the finest grit, lapping compound (600), slide the trigger and bow in and cycle them back and forth a couple hundred times to lap them into place. Next, clean all the abrasive compound and any lubricant off the frame and trigger assembly. I use a spray bottle of Simple Green and a toothbrush, then a fresh water rinse and a blow dry and maybe a few minutes in a warm oven. Now, add a little of your favorite lube to the frame tracks and trigger surfaces. I like to use a moly bearing lube with a light carrier that evaporates and leaves the moly behind. This approach seems to reduce the dirt pick up in this area compared to a grease type of lube.
  Finally, slide the trigger and bow into the frame and insert the magazine. Slide the trigger assembly back and forth to check for any drag on the magazine. There should be none. It is possible to straighten a trigger bow if its bent, but it’s better to keep it straight from the start. At this point, If you tilt the frame and magazine assembly forward and back, the trigger assembly should slide easily under its own weight back and forth without any perceptible chatter or drag. Now that’s a nice piece of work !
Next look is at the parts and springs the trigger bow pushes on. Stay tuned.
